This article is primarily intended as an introduction for users that only manage content in Mattrbld and aren’t interested in the technical background. If you have already read through other parts of this documentation, some information may appear redundant to you.
If you’re a content editor that has come here to get familiar with the parts of Mattrbld that you’ll be interacting with, you’re in the right spot! In this article, you’ll get a detailed overview of the application interface and its functionality. Some sections may link to other articles with more in-depth information on how these systems work in the background, so feel free to check them out if you’d like to take a peek under the hood, but know that they are completely optional if all you want to do is edit content.
The Dashboard
As a content editor, you’ve likely imported a project via an Invite Link and are now presented with the dashboard of your project.
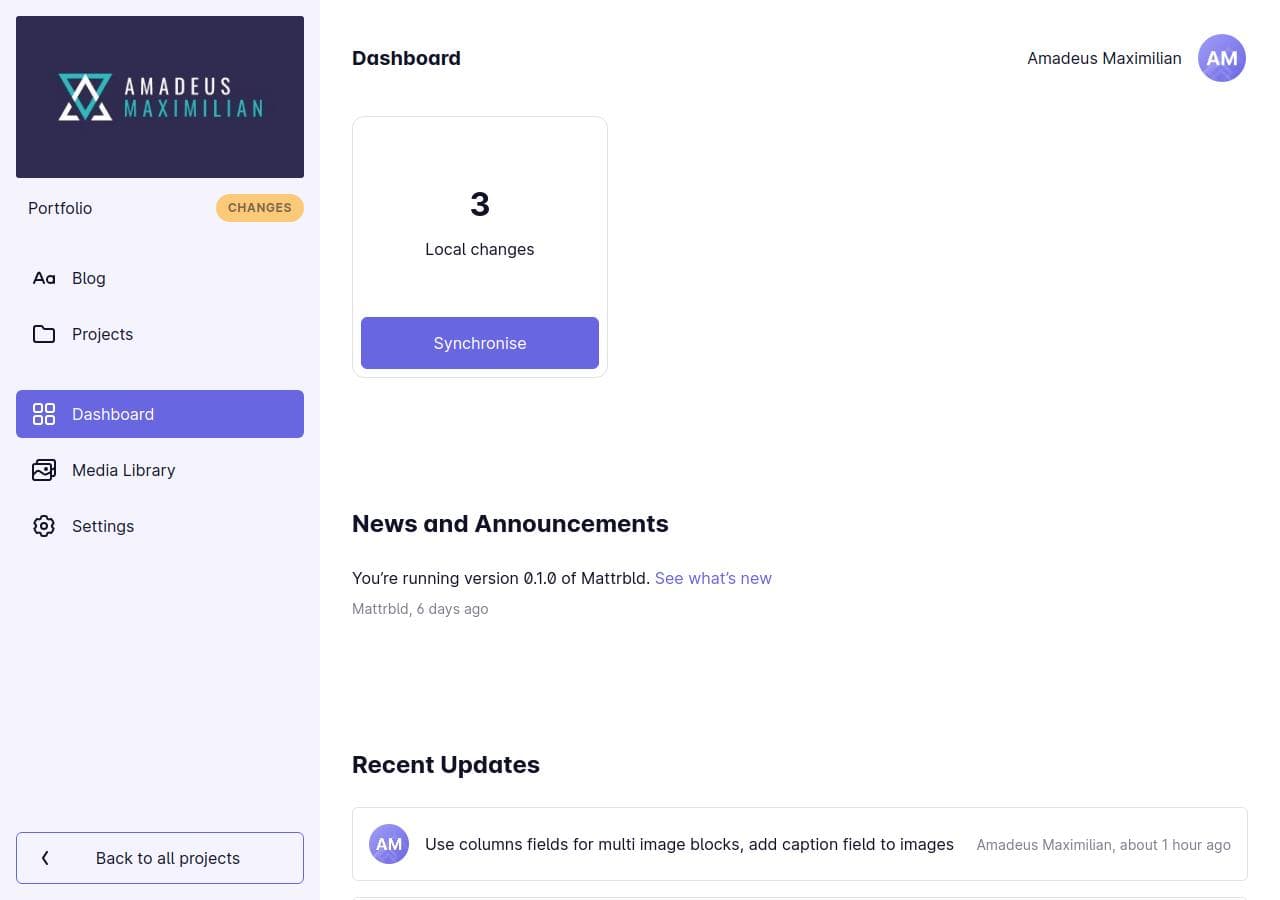
Here you’ll find all crucial pieces of information regarding your project:
Whether or not you have any local changes that have to be synchronised
Quick access to frequently used content, if set up by a developer
Any news and announcements regarding your project, as well as a way to learn what’s new in the version of Mattrbld you are currently using
Recent Updates about your project, so you can easily tell who did what and when they did it
A list of Locally Changed Files that have been changed on your current device, but have not yet been synchronised with your collaborators
You will end up on the dashboard whenever you open a project from the home screen of Mattrbld, which shows all imported projects and allows you to import new ones. You can also get back to the dashboard while working on your project by either clicking the big thumbnail image at the top of the sidebar, or by selecting “Dashboard” in the list.
The Project Sidebar
The sidebar is your main way of navigation within a project. Unless you are working on a specific piece of content, it will always be visible on the left hand side of the screen. If you are editing content on a small screen device such as your smartphone, you can pull the sidebar into view by swiping from the left or using the button at the top left of the screen.
The sidebar is structured into four distinct sections:
At the top you’ll find the project in formation section, where you’ll see your project’s thumbnail (to know what you’re working on at a glance), as well as the project’s name and its synchronisation status. This status indicator will be green when the project is fully synced and has no local changes, orange if you have local changes and red if there was an error. You may also see the label change to a loading animation occasionally, this happens that a syncing operation is in progress and you can get some status information by hovering the indicator
Below the project information section, you’ll find all the content you can work on, either in the form of Collections, or individual files. In some projects there may also be links to some documentation here
The second to last section houses links to go back to the dashboard and to access the Media Library, which we will discuss next
Last, but not least, you’ll also be able to return to the home screen, i.e. the overview of all your Mattrbld projects, by using the button at the bottom of the sidebar
Project Media Library
Clicking the Media Library link in the sidebar will take you to the media library of the project you are working on. This is a central place to upload and manage media files like images, videos, PDF documents, and more.
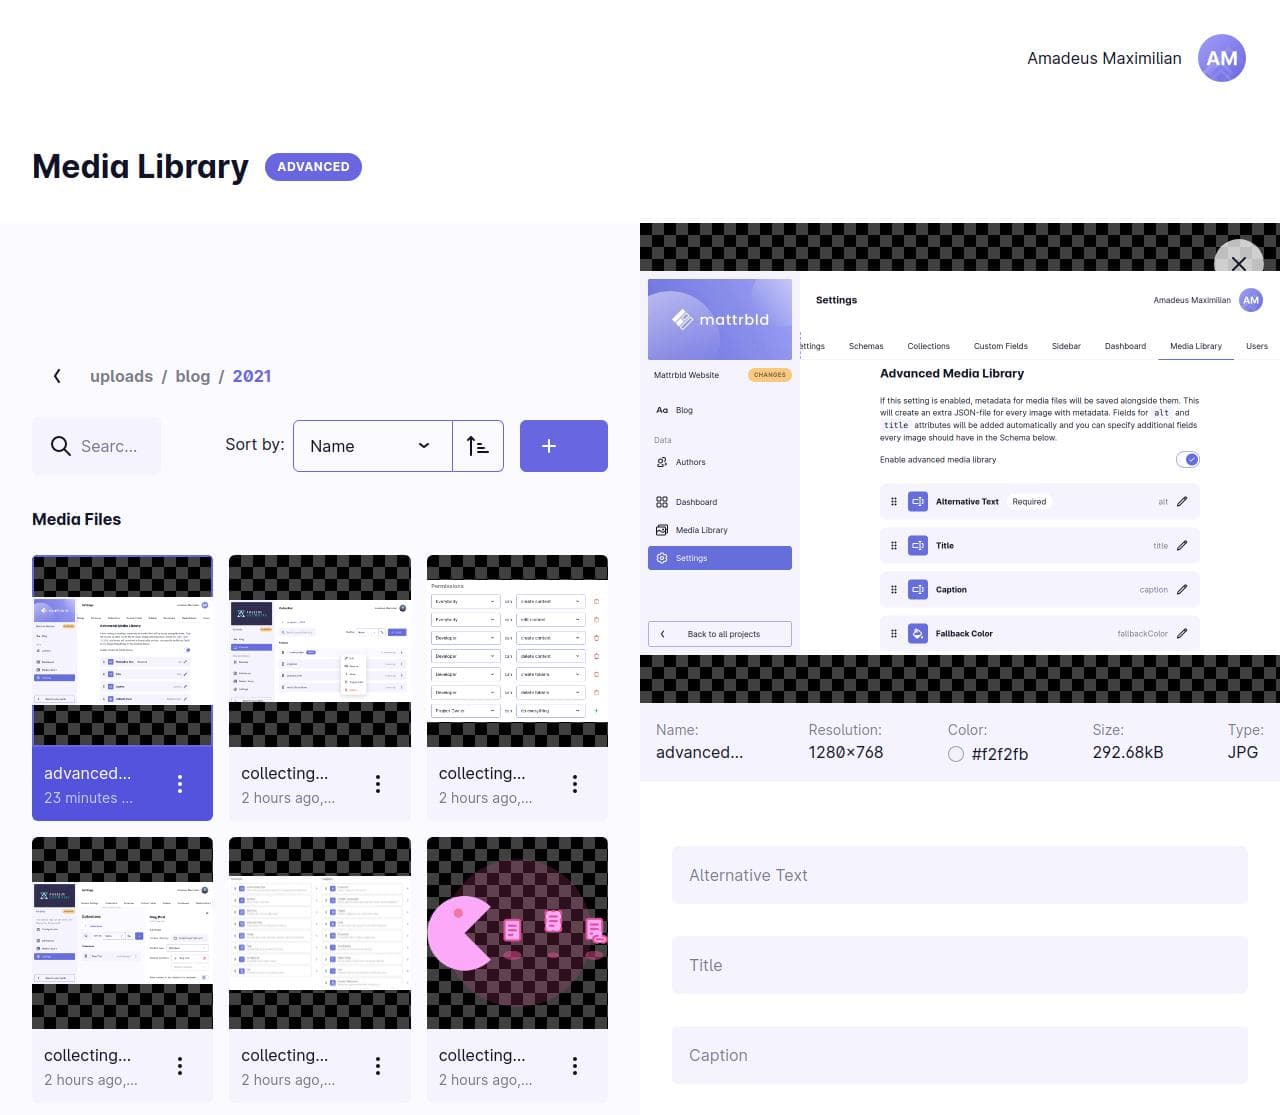
Depending on how your project is configured, you may be able to create new folders in the Media Library to better organise media files. You can also filter the files in the current directory by typing in the search field, or sort them by either their name or when they were last edited in ascending or descending order using the controls labelled “Sort by”
Images will show a preview thumbnail, while other types of media content will show an appropriate icon for their type. Clicking on one of the files opens a panel on the right side of the screen (or an overlay on small screens) that shows a larger preview and important details about the file, such as its size, resolution, type and more.
If the “Advanced Media Library” was activated and configured for your project, you will also find a form of input fields below the preview of the media file, allowing you to specify custom metadata that should be used as a default whenever this item is inserted into content. This is a great place to store alt information for images, for example, since that description is likely going to be the same wherever the image is used.
The bottom of this area also houses two actions to perform on the item:
Clicking on “Replace Image” will overwrite the image file with a new one, but keep everything else the same so you won’t have to update any content that may reference the image
The second option allows you to delete the media file from the project, but keep in mind that this will not update content referencing the file, so you will have to update that as well
Actions to move, rename and delete media files can also be accessed by either using the vertical three-dot menu in each file thumbnail, or by right-clicking it.
Last, but not least, you may add new folders or upload media into the currently opened directory by clicking the purple button in the top right. As a convenience feature, you can also simply drag and drop media files from your file manager or desktop into the window to upload them to the currently opened directory.
Collection Details
Opening a Collection from the sidebar will take you to a detail view of that Collection, showing all files and sub-directories within that Collection.
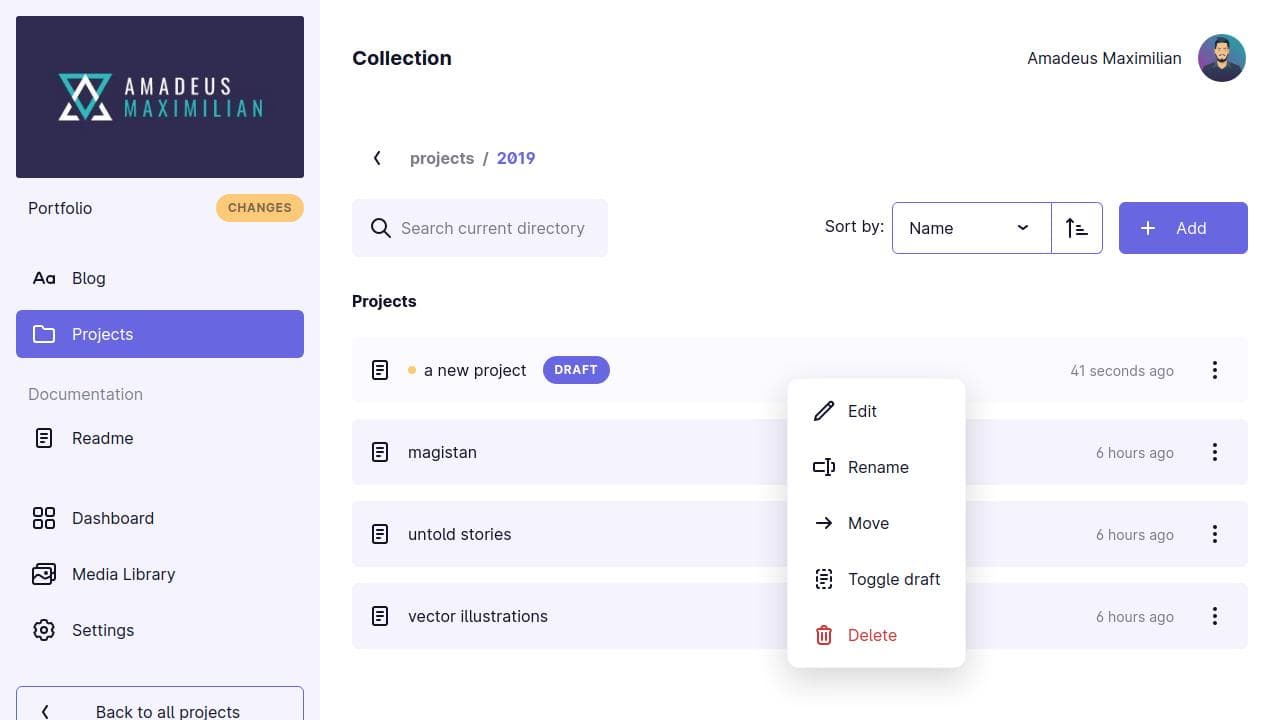
This view will look and function very similarly to the Media Library, except that files are shown in a list instead of a grid of thumbnails. In this list you’ll see the name of a file, whether or not it has local changes (symbolised by a small orange dot next to the name) and whether or not it is a draft, as well as when the file was last edited.
Left-clicking an entry in this list will open the file for editing. Right-clicking or left-clicking the three vertical dots at the right hand side of every list item, will open a context menu with options to edit, rename, move, and delete the file. If Drafts are enabled for the project, you will also have the option to mark and unmark the file as a draft from here without having to open it.
New files and folders can be created by clicking the purple “Add” button at the top right.
Depending on how the Collection was configured, you may not have permission for and be able to perform certain actions, such as creating files or folders, in that specific Collection. If that is the case, you simply won’t see the options for doing so.
If you find yourself needing to perform an action that you don’t have permission for, contact the person who set up the project for you so they can update your permissions.
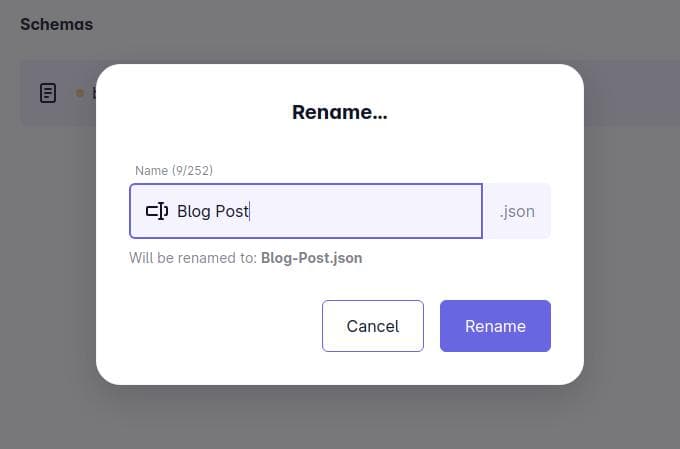
When creating or renaming a file or folder, you may notice that the name you type might not exactly match the name that is displayed below the input field. This is because Mattrbld automatically takes care to remove any invalid characters from filenames, so you cannot accidentally type something that’s not allowed. Mattrbld will also take care of adding the right file extension for you.
The Content Editor
Opening a content item will take you to the Content Editor, which will hide the sidebar so you can fully concentrate on the piece of content you are editing.
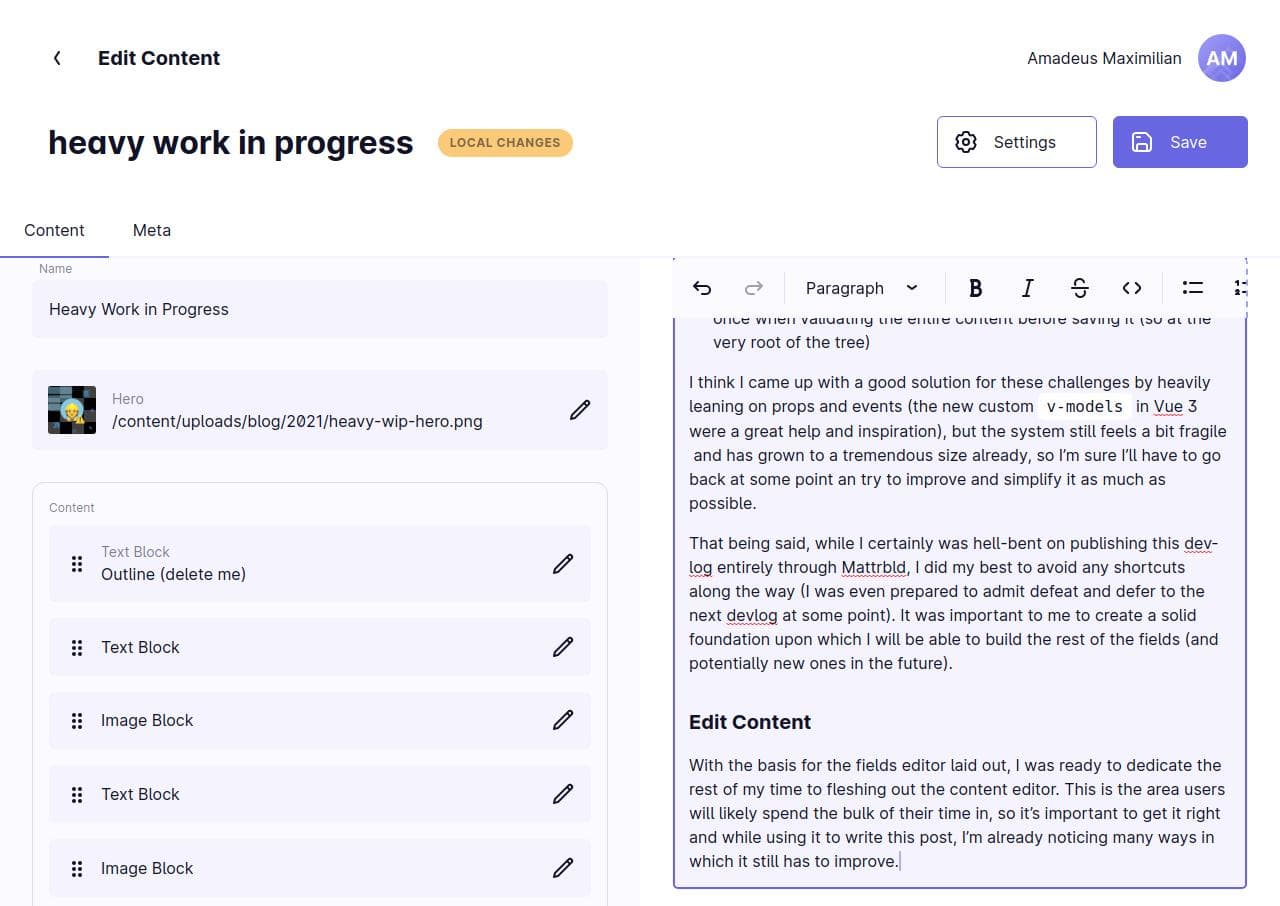
The Content Editor consists of two main sections:
The information section at the top that shows the name of the file, its sync status and buttons for toggling draft content, accessing global settings for that particular content item, showing the realtime content preview, and saving your changes
The rest of the screen is filled by the content section, where you’ll find the input fields to edit your content. This section is completely customisable by the user setting up Mattrbld so it can be as intuitive and accessible for editing content as possible. For example some content items might have different parts of information that is broken up into multiple tabs, while others nest information into groups that will show up in a panel on the right when expanded
The toggle for draft content and the button for the live content preview may not be available in the Content Editor if drafts and content previews were not enabled by the user setting the project up for Mattrbld.
You may edit content as much as you like by changing the values in the different fields displayed in the content section. Don’t worry about breaking anything, the fields you edit can be set up to validate your content and warn you about any invalid changes you make.
If there are any errors, you will not be able to save content that is not marked as a draft, and if it is a draft you won’t be able to mark it as a regular piece of content until you fix all the validation errors.
If the content is split up into multiple tabs, there might be validation errors in fields you cannot currently see. If that is the case, watch out for a little red dot next to the name of the tab to find under which tab the invalid fields live.
Content Previews
If the live content preview was enabled and configured for your project, you will be able to activate it by clicking the “Preview” button between the “Settings” and “Save” button in the top right. This will split the content section in half, showing a preview of the content you are working on in the right column and the content itself in the left. This preview will update automatically with every change you make.
While hovering your mouse over the top of the content preview near the close button, you will see some options allowing you to open the preview in a new window, to display the preview in full screen, or on a mobile device, so you can get a good idea of what the content will look like once published.
Keep in mind though that the preview is just that: a preview. Some functionality, such as content references or media files other than images might not work correctly.
Once you are happy with your changes, simply save them using the purple “Save” button in the top right. This will mark the file as locally changed so it can at a later point be synchronised with your collaborators and / or published.
Conclusion
Mattrbld was designed to make managing content as easy and intuitive as possible. Many of the interface elements will work the same whether you are editing a media file or a content item and you should never have to worry about making a mistake thanks to validation rules and sensible defaults. All the knowledge you gain in one area of Mattrbld will also apply to the others.
Where it makes sense, the live preview can give you a good idea of what your content may look like once published without having to wait long or dealing with staging versions of your project.
The next article in this section will walk you through the creation of a piece of content in more detail, but you can also jump ahead and learn about syncing your changes and working with drafts, if you’re curious.
