Creating and Editing Content

Amadeus
This article is intended for content editors who have not created or edited content in Mattrbld yet. It’s similar to the Quickstart Guide, but focused entirely on the content editing experience rather than the technical underpinnings and project configuration.
In this article you will see how to create a brand new content item from scratch and edit it for the first time in Mattrbld. We will look at the entire process step by step so you can get familiar with the interface and core principles.
Prerequisites
If you would like to follow along within the application, you will need to have a project already imported and set up. Your developer or agency will typically have done so and supplied you with an invite link.
Don’t worry if you don’t have access to a Mattrbld project at the moment, simply reading this illustrated guide should teach you everything you need to know and serve as a good reference if you need to look anything up at a later point in time.
For the sake of this article, we’ll be working on an imaginary blog titled “Sam Says…” and creating a new post for it.
Getting Started
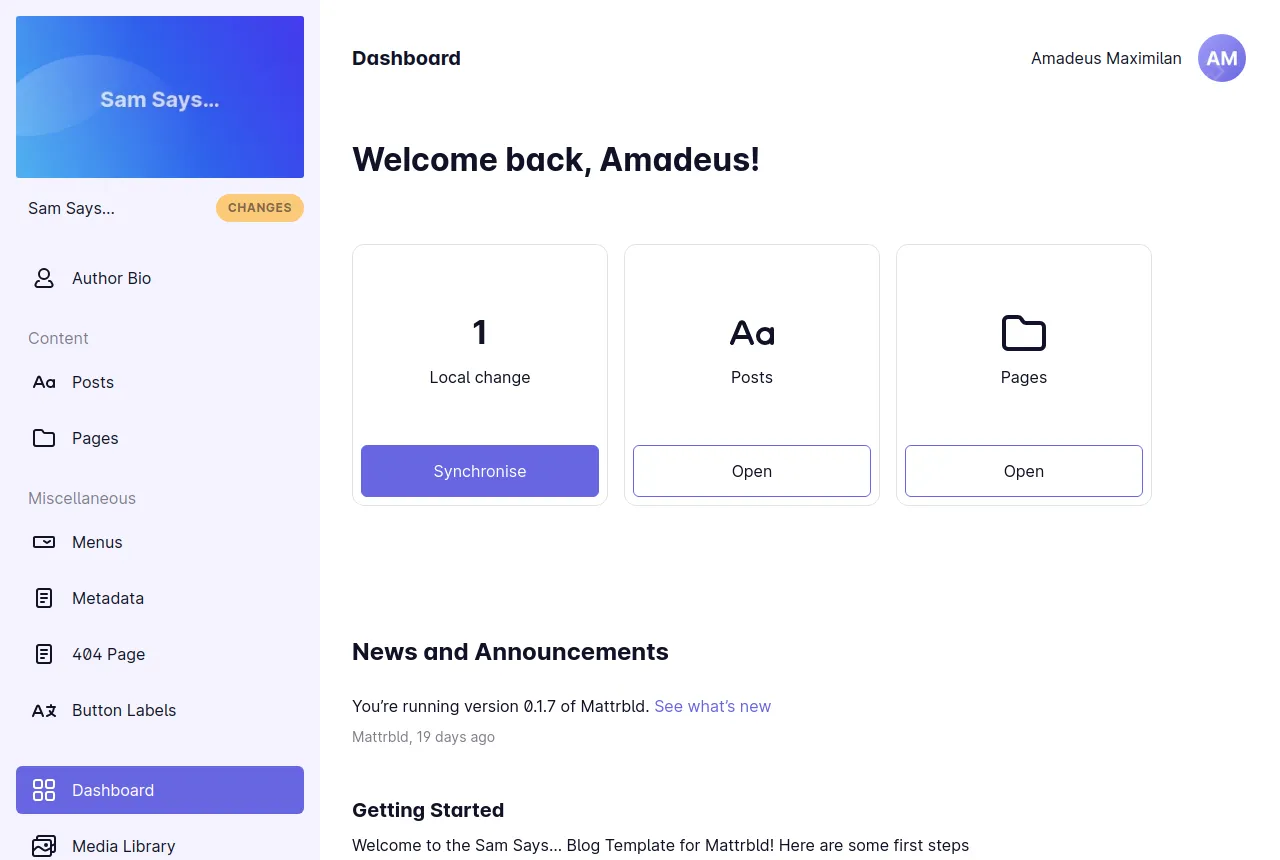
As mentioned in the UI Overview article, you will be greeted by the project dashboard after importing it via an Invite Link or opening it from the home screen.
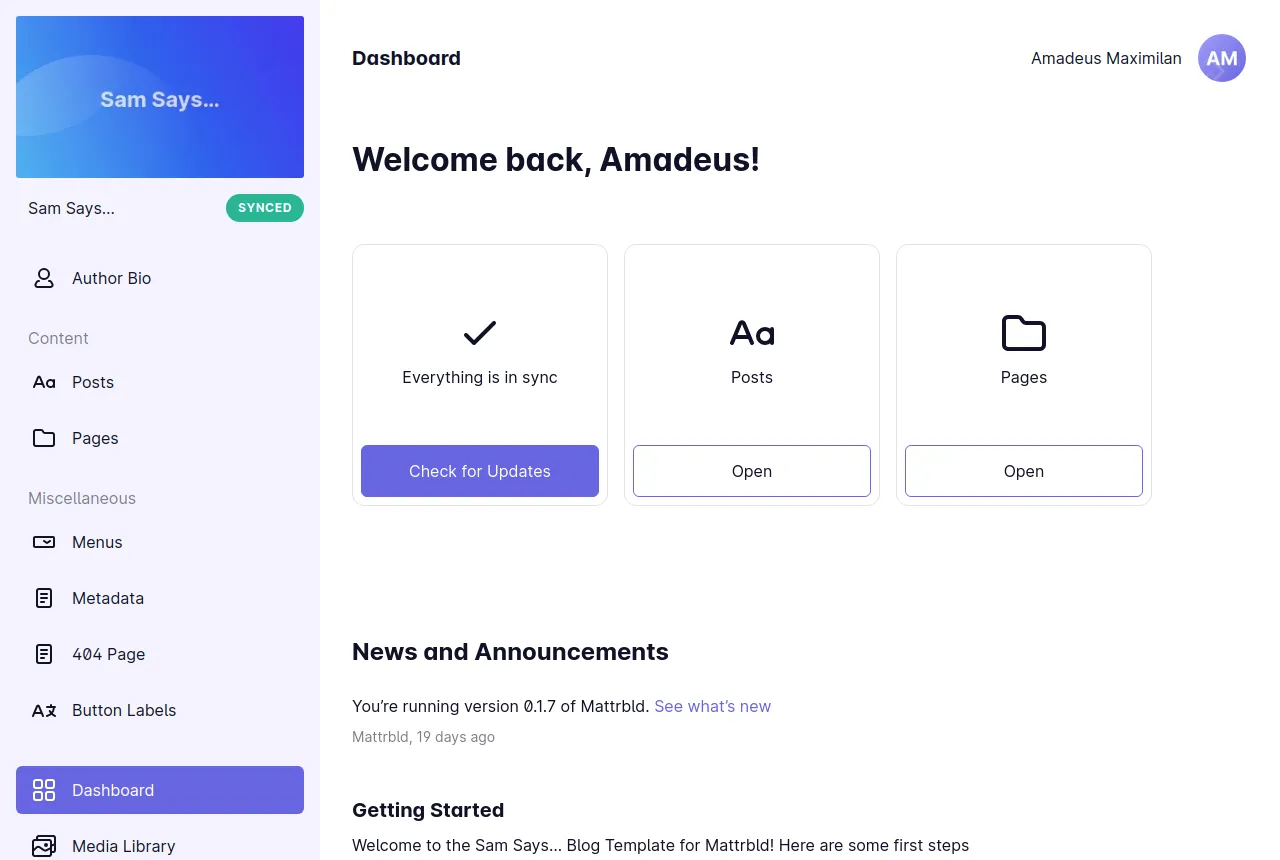
From here you should be able to access the blog posts of the project either via the entry in the sidebar, or a card right at the top of the dashboard. In the screenshot above both the entry and the card are illustrated with a “Aa” icon and labelled “Posts”.
Click on the entry in the sidebar, or the “Open” button of the card to enter that Collection and see the content within it.
Depending on how your project was configured, the icon, the label and the position might be different to what is shown in the screenshot, but the principle stays the same: clicking on the entry in the sidebar, or the “Open” button of the card will take you to the content you want to work on.
Creating a New Post
Once you’ve opened a collection of content, in our case “posts”, you’ll see a list of existing files and folders in that collection. How exactly you choose to organise the content in your project is up to you, for Sam Says… we’ll have all posts in one long list and no sub-folders.
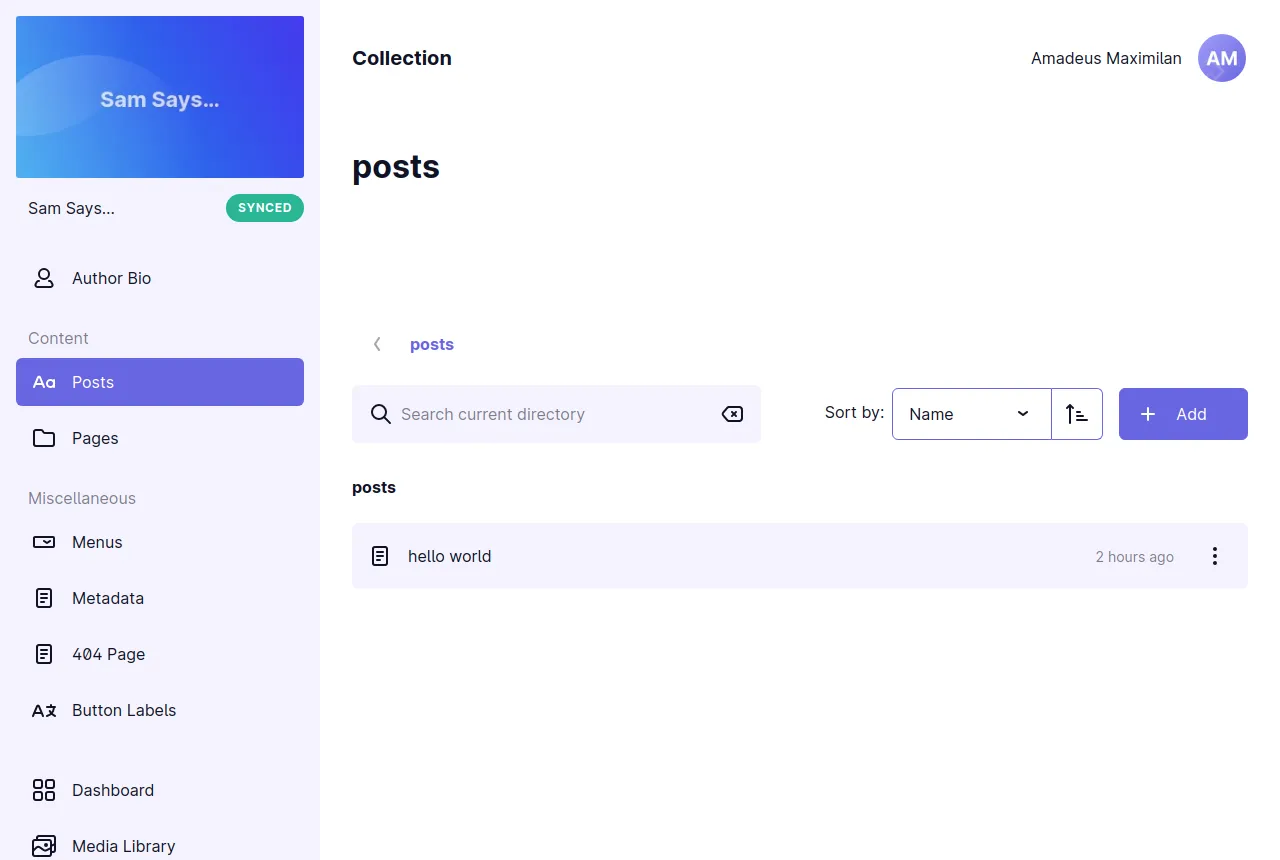
In case you’re looking for an already existing piece of content, you can either search for it by typing in the search field at the top left, or by using the sorting options in the top right.
To create a new piece of content, click the purple button labelled “New”, which will bring up a modal window allowing you to create either a new folder, or a new piece of content.
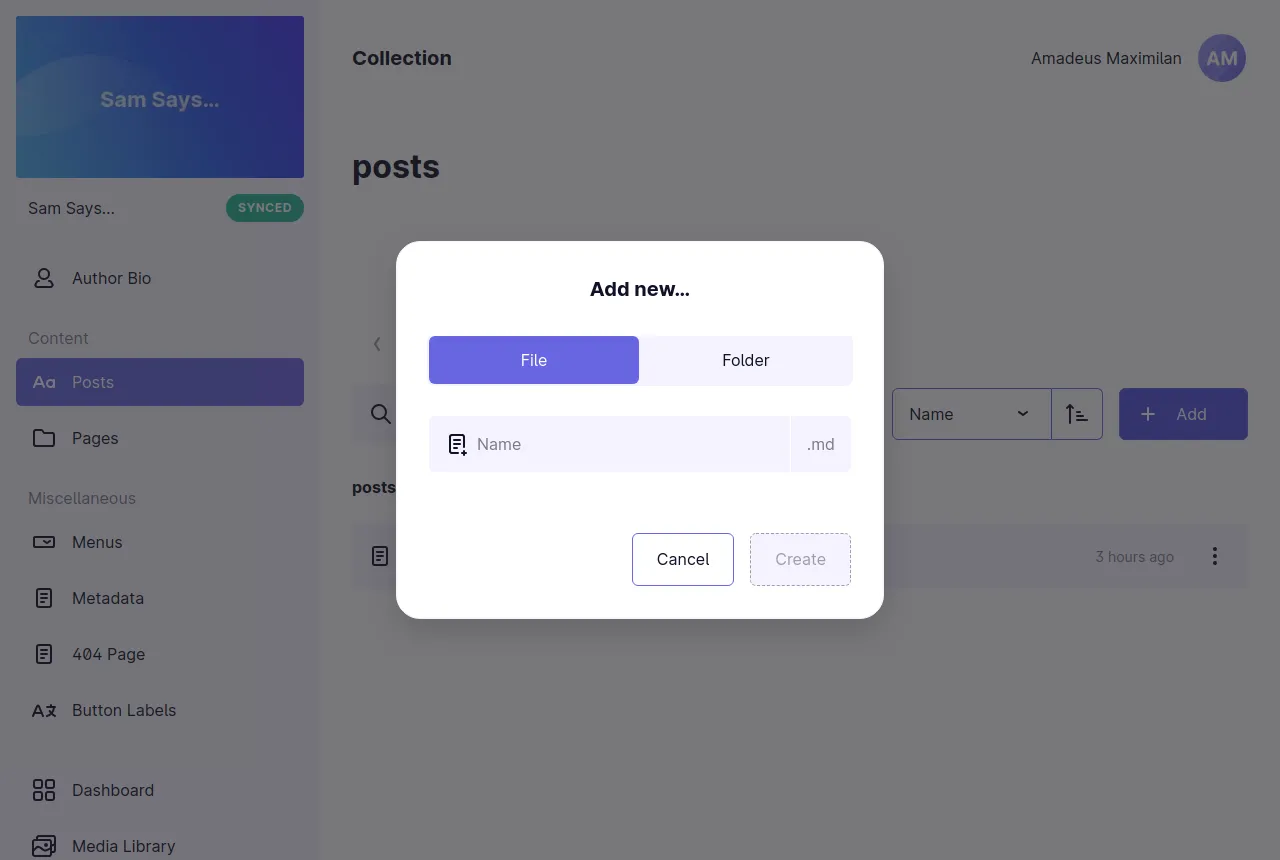
Depending on your permissions within a given Collection, you might not be able to create files, folders, or content of any sort. If that’s the case, what you see might look slightly different.
Enter a new name for the file and click “Create” to create your new post. As you can see in the screenshot, the right file ending will automatically be added for you. On top of that, Mattrbld will also automatically ensure that there are no invalid characters in the file name, which is why the result might look slightly different from what you have typed.
It’s worth mentioning that in most cases the name of the file is not equivalent to the title of the content, in this case the new blog post. Think of the filename as how the content item is displayed to you and other editors in Mattrbld, not as how it will look to users of the website.
Editing the New Post
As soon as your new content item is created, you will be taken to the Content Editor, where you will be able to edit the content of your new post.
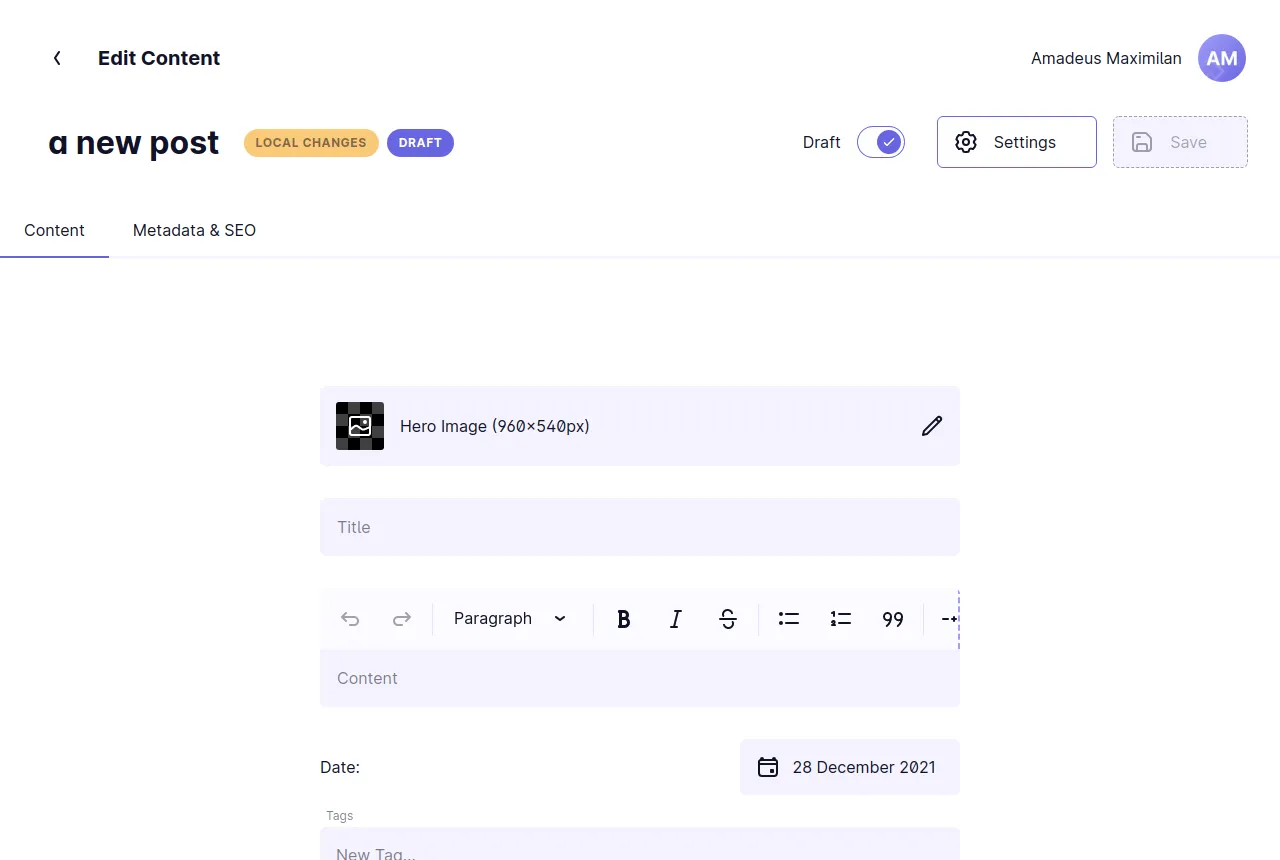
As you can see from the screenshot above, the new post was created locally on your device and is marked as a draft, since draft content was enabled for the project. Draft content will not be published even after local changes have been synchronised. The draft status can be toggled using the switch near the buttons in the top right.
Not all projects will have drafts enabled and not all Collections will be set to create new content as drafts by default, so you might not see the options relating to drafts in your own project.
Using the “Settings” button in the top right, you will be able to rename the piece of content you are editing, or delete it, in case you no longer want to use it.
If your project supports real-time previews, a button to toggle that preview would appear next to the “Settings” button as well. Since the project in this example doesn’t support them, there is only the “Save” button, which will become interactive as soon as changes were made to the content and which you can then use to save those changes on your device.
Below that first row you will find a set of tabs (“Content” and “Metadata & SEO” in the example above) if the content is spread over multiple tabs. Clicking on a tab will show its contents in the editor section below.
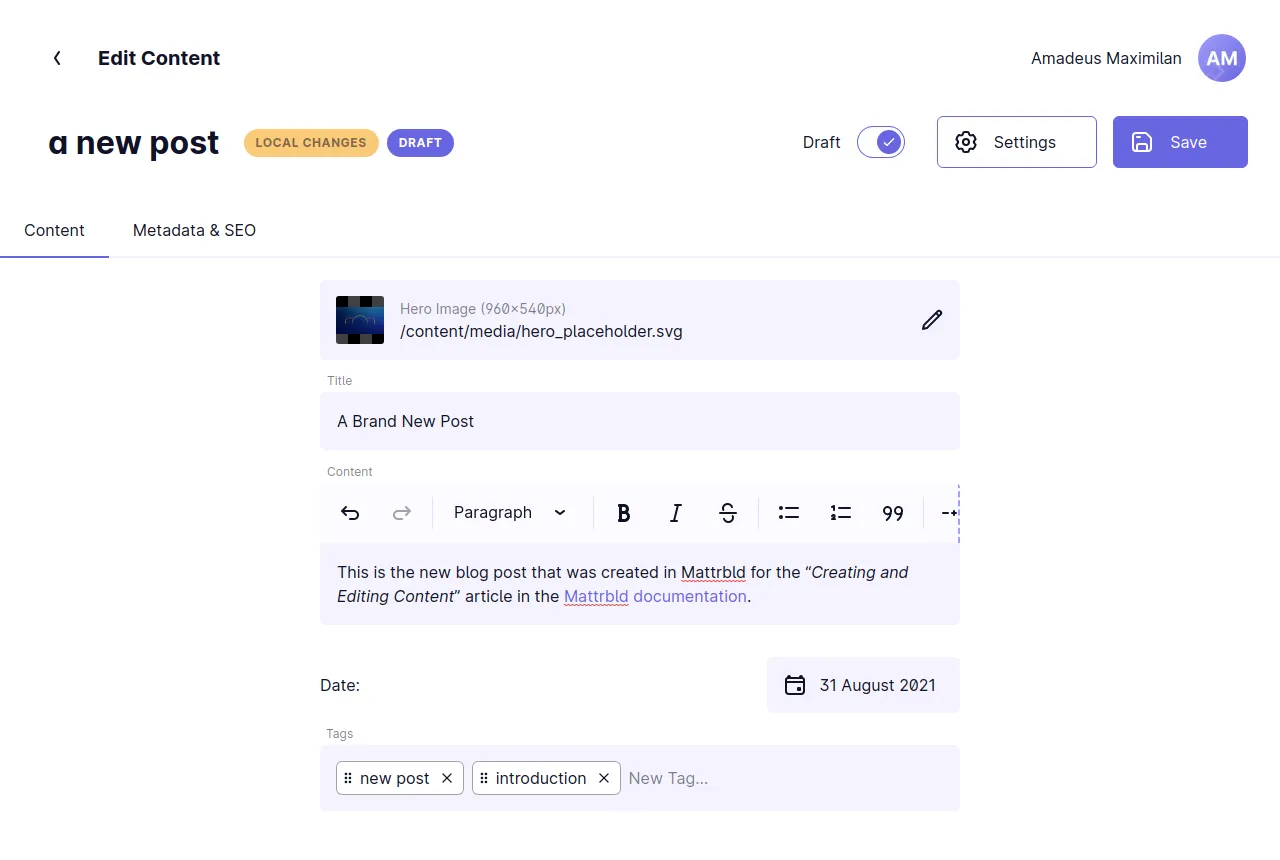
The rest of the screen is taken up by the various fields the content item provides. This is the area where you will be working on the content itself, by adding images, entering text, and more. Simply treat it as an interactive form where you can enter your content.
Depending on the type of content you are creating and how it is structured by the developers of your project, the fields themselves and their layout may vary. Since we’re working on a blog post in this example, the fields are what you may expect from a blog post:
A hero image
A title
The content of the post
A date when it was published
Some tags in order to categorise the content
After entering these details, your post could look somewhat like this:
Mattrbld will validate the fields of a content item according to the rules set by your developer, so there really isn’t anything that you could do wrong by accident. If you forget to enter an important piece of data, or the data you have entered is not valid for some reason, Mattrbld will warn you and provide you with a hint on how the error might be fixed, when possible.
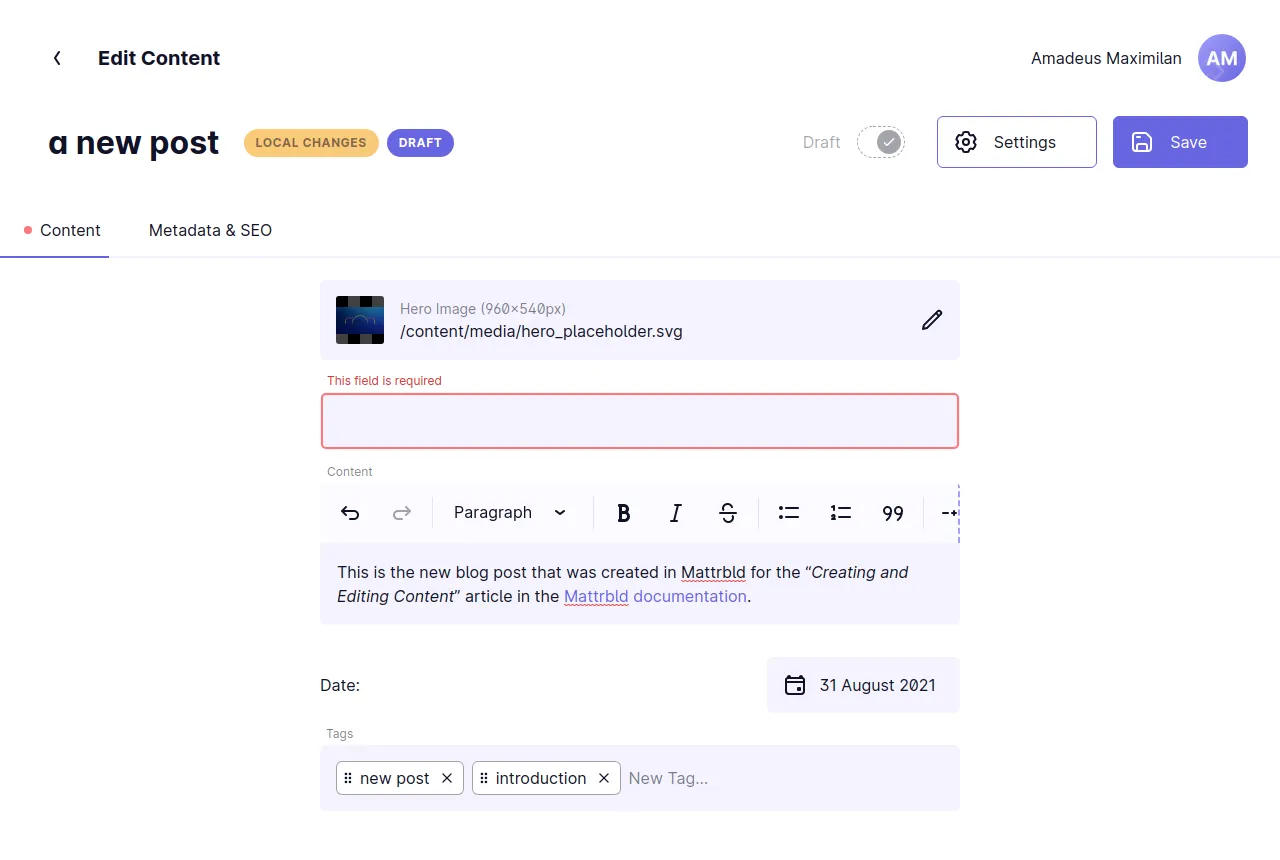
As you can see above, the “Title” field was left blank and Mattrbld warns that it is required. Also note how there is a little red dot next to the “Content” tab, showing that there is a validation error in this tab, as well as the “Draft” toggle being greyed out.
Content with validation errors cannot be saved, unless it is marked as a draft. Drafts with validation errors cannot be published. This is to ensure that no invalid content makes it into the public version of a website or other type of project.
Saving, Publishing and Synchronising
After fixing all validation errors (if any), you can save your new content item by clicking the “Save” button in the top right and returning to the collection overview via the “Back” button in the top left, or by using your browser’s back button.
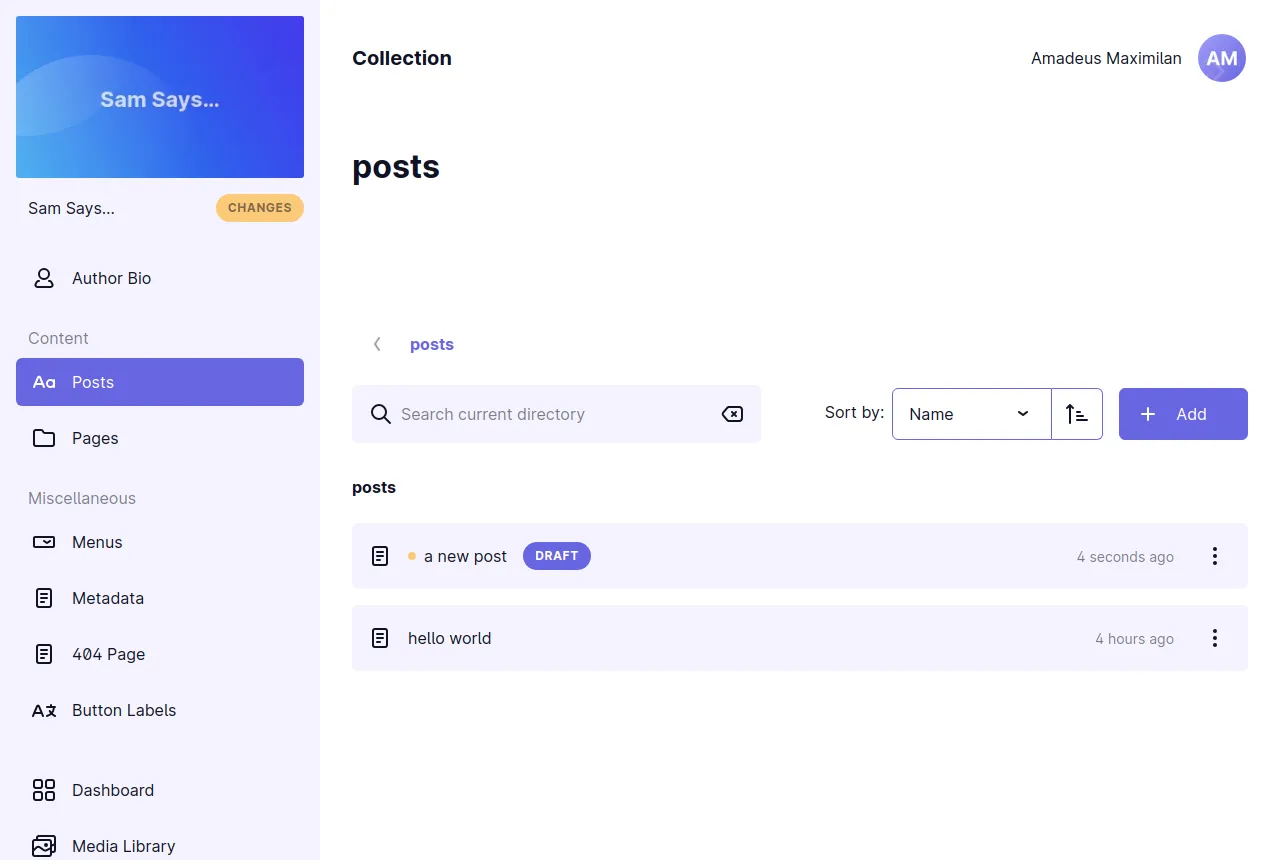
Our newly created post is now visible in the list of posts—but still marked as a draft, which means that it would not be visible on the blog even after we have synchronised our local changes.
To ensure it will be visible, we have to toggle the draft status either by re-opening the post and switching the “Draft” toggle to “off”, or more quickly by using the context menu of the list entry, either by right-clicking it, or by clicking the three vertical dots on the right.
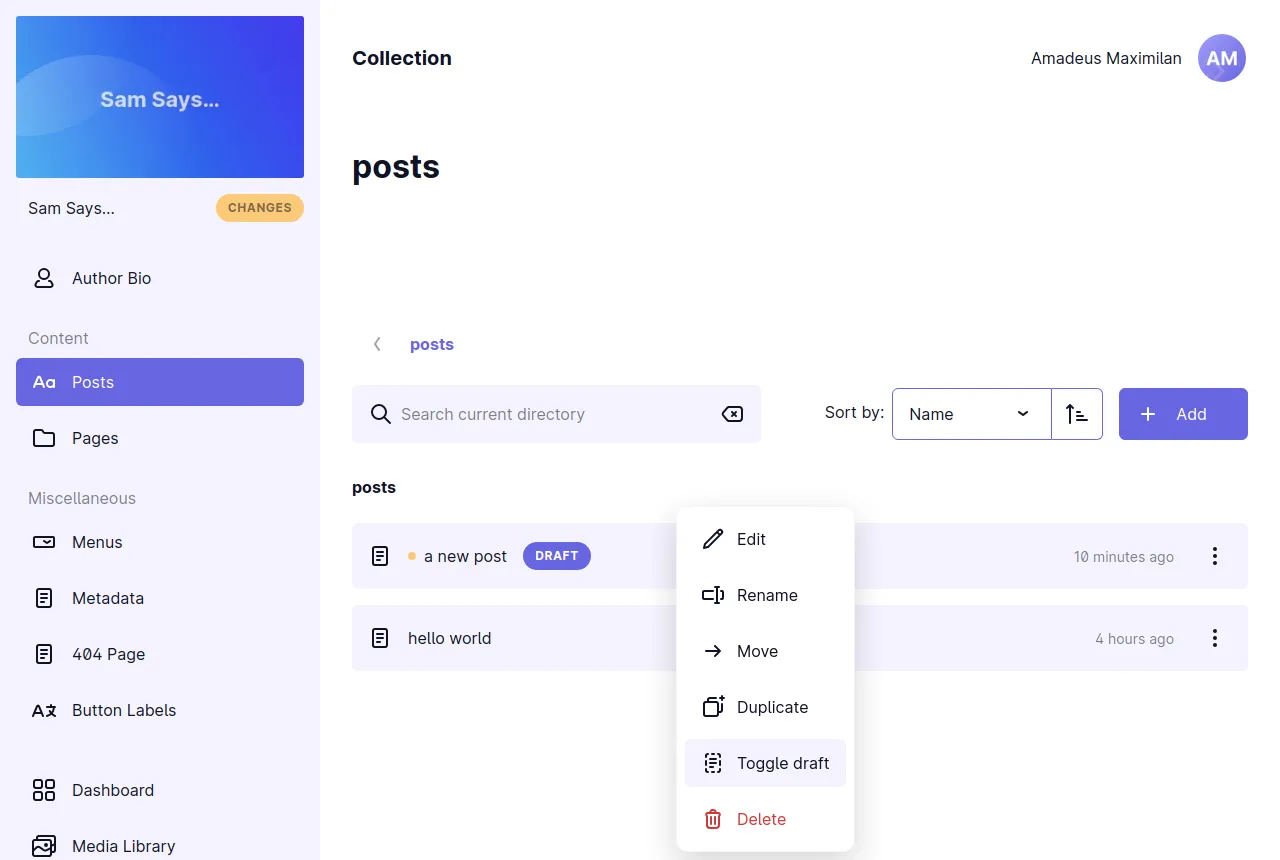
Clicking “Toggle draft” in that menu will remove the draft state of an unpublished content item, thus publishing it. Note, however, that there is still a small orange dot next to the name of the blog post, denoting that the changes are still local to the device you’re currently using and haven’t been synchronised yet, which means they will not be visible on the actual blog.
Synchronising Changes
Everything you do in Mattrbld happens locally on the device you are currently using until you synchronise these changes. This ensures that no resources are wasted and you can safely make any changes you would like without endangering the public version of your project.
However, this also means that you need to remember to synchronise your changes before you or your team members can work on changed content from a different device, or the changes become visible to the public.
There is a distinction between published and synchronised content:
Published content is not marked as a draft and will be visible to the public once synchronised
Synchronised content (including drafts) was moved from your local machine to the internet so it is available to other members of the project or you on other devices
To synchronise your local changes, simply head back to the Dashboard using the sidebar, either by clicking on the entry in the list or the thumbnail image of your project at the top.
As you can see in the screenshot above, the status indicator in the sidebar is no longer green, but orange and is now labelled “Changes” instead of “Synced”. On top of that, the first card in the dashboard shows that there is one local change to be synchronised.
Clicking the purple “Synchronise” button will open a modal window allowing you to synchronise the content item you just created so it will become available to everyone in the project:
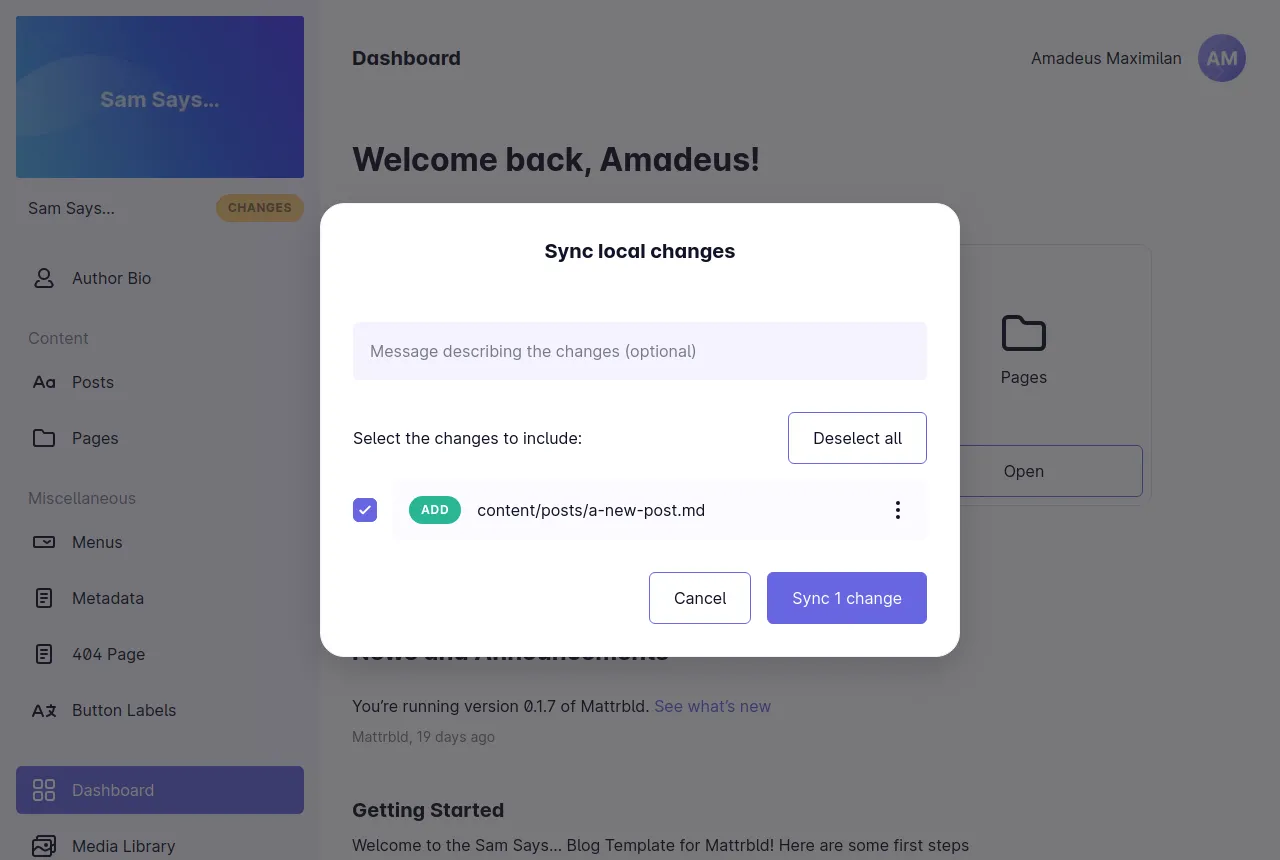
In this modal window you may enter an optional message describing your changes at the top, which will then show up in the “Recent Updates” section of the project dashboard to let your team members know what exactly you did.
Below that you will find a list of all files that were modified on your local device. They will be marked according to the type of modification:
Add for newly added files
Modify for files that existed, but were modified locally
Remove for files that existed, but were removed locally
Since all we did was create a new blog post, it is the only item showing in the list. If there were more, you could select which ones you would like to synchronise, for example to exclude local experiments that you decided to discard.
Click the “Sync 1 change” button after entering your message and making sure the newly added content item is selected to start the synchronisation process. You will likely be asked to enter the username and password that your developer or agency provided you with at this stage, so keep those at hand.
Depending on the size of the files you have changed and the speed of your internet connection, the sync process may take a moment, but once it is done, you will receive confirmation that your changes were synced successfully and be able to continue working on your content.
It is considered a best practice to group a related set of changes under one synchronisation operation instead of synchronising every single change as soon as it occurs.
If you are curious to learn more about the synchronisation process and how you can check and discard local changes instead of synchronising them, feel free to take a look at the article dedicated to synchronising changes.
Conclusion
Congratulations! 🎉 You have successfully created, edited and published your first content item with Mattrbld! This is really all there is to it for any type of content, be it a blog post, a page menu, or a new team member.
Simply open the respective Collection, create and edit files, and once you’re done remember to synchronise your local changes so everyone in the project can access them and any published changes become visible to the public.
As this covers all you need to know about editing content in Mattrbld, the rest of the articles in this section will once again be more technical and geared towards developers setting Mattrbld up for a project, but feel free to read them as well if you are curious.