Media in Mattrbld
Hardly any content these days consists only of text, which is why a modern content management system should support other types of files as well, especially images first and foremost. While Mattrbld isn’t suited for media-heavy projects, as outlined in the article on limitations, it still features a Media Library to make it easier to manage multi-media content, and especially images.
This article will provide you an overview of how the Media Library works and how you can configure it. If you are just looking for what you can do with it as a content editor, feel free to check out the UI Overview article instead, which contains a section dedicated to the Media Library from a content editor’s perspective.
What are Media Files?
In Mattrbld, regular content is stored in text files. All other types of files, such as images, videos, file archives and PDFs, are considered media files.
They cannot be directly edited from within Mattrbld, but may be referenced by regular content files, for example to add a hero image to a blog post.
Enabling and Configuring the Media Library
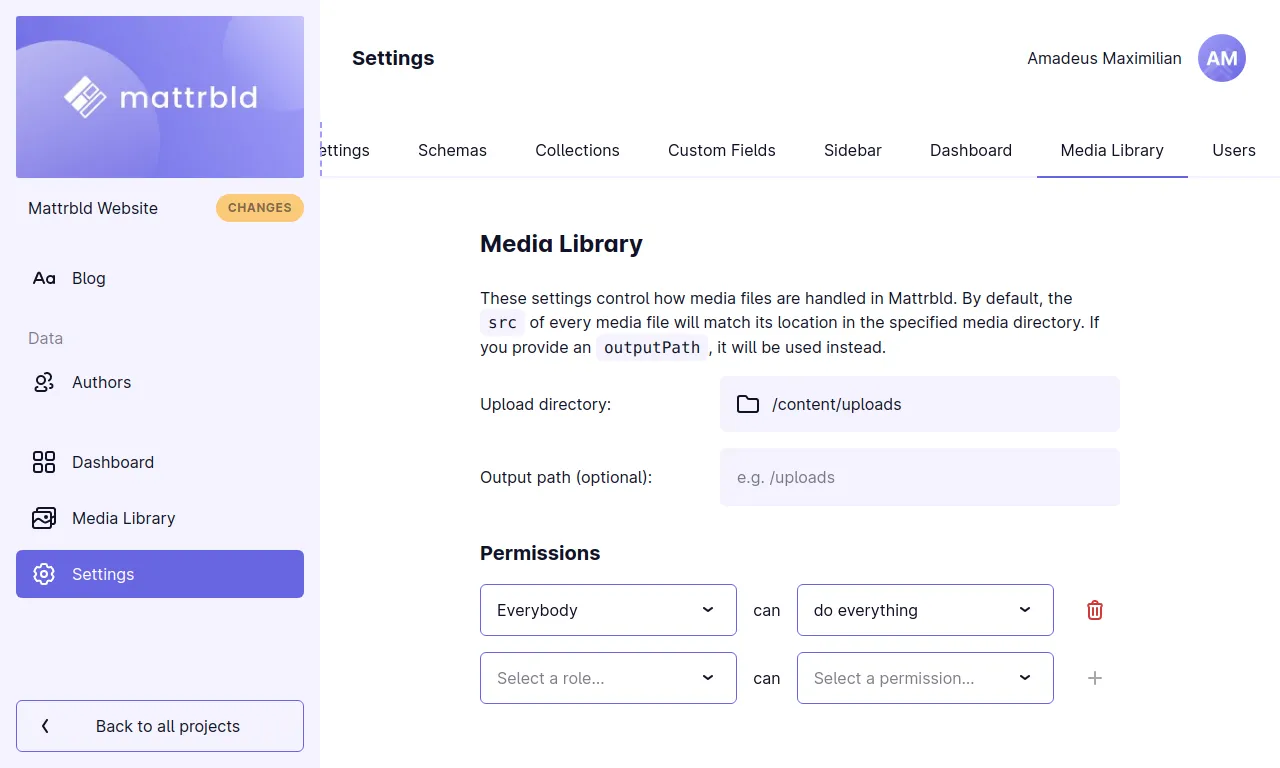
The Media Library will be activated as soon as an upload directory is provided in the Media Library tab of the Project Settings. This folder will serve as the root folder for all uploaded media files.

Maximum File Size
This option (added in version 0.3.0) allows you to specify a global maximum file size (in MB) for media files uploaded to the Media Library. If this option is set, you and your collaborators will not be able to upload files larger than the specified value to the Media Library from the Media Library screen or any Image or File fields that do not specify a custom maximum size.
Output Path
Here, you may also specify an optional output path, which will then be used as a prefix to the media file instead of its location in the upload directory.
If no output path is provided, when adding for example an image to a piece of content, the inserted path will match the location of the file in the upload directory. So if the upload directory is set to /content/media/ and the file hello-world.png is added to a piece of content, the piece of content will contain /content/media/hello-world.png as the value for the image.
Should you provide an output path of /, however, for example because your static site generator moves all images to the root folder during build-time, the path would instead be /hello-world.png.
Mattrbld will not modify existing content if you specify an output path after having already created and edited content through Mattrbld! You will have to update affected content manually.
As a best practice, setting up the Media Library should be one of the first things you do after importing a project into Mattrbld for the first time.
Permissions
You will also be able to specify which permissions members of your project have concerning the Media Library. For example, you could restrict regular content editors from uploading new media files or creating new directories by setting up specific rules for them.
By default, every member of the project is allowed to do everything. You can read more about the permission system in Mattrbld in the article dedicated to the topic.
Advanced Media Library
The Advanced Media Library allows you to associate metadata to the media files stored in the library. It will be discussed further in its own article.
Using the Media Library
Once configured, the Media Library can be accessed through the project sidebar and will be presented as a file browser like content in a Collection would be, except that the files show as a grid of thumbnail image if possible, instead of a plain list. Clicking on a file in the grid will open a side-bar with a larger preview and details about that file such as:
Resolution and dominant colour (for images)
File size
File type

If not forbidden in the media library permissions, new folders can be created via the purple “Add” button in the top right to further organise the media files.
New media files can be uploaded to the currently open folder either via that same “Add” button, or by simply dragging and dropping them into the appropriate field that will appear as soon as a file is dragged over the Mattrbld window.
When editing content items with fields that interact with the Media Library, such as Image and File fields, editors will be able to pick and / or upload new files straight from within the Content Editor.
Media files can be renamed, moved, deleted or replaced from within the Media Library.
Replacing a media file instead of uploading a new one and deleting the old one ensures that the path of the file doesn’t change, so you won’t end up with any missing files in case you forget to update content items that referenced the old file to point to the new file.
It’s ideal to update images that were used in multiple content items at the same time quickly and easily.
Recap
The Media Library is the one stop place in Mattrbld for any content that is not a text file. Mostly you will be using it to store images, but other files such as videos and PDFs are also supported. If the Advanced Media Library is active, you will also be able to manage any metadata that is supposed to be attached to the files from there.
In the next article, we’ll look at some considerations that you’ll have to make when adding media files to a Mattrbld project. If you know all about binary files in Git, feel free to skip ahead to the article on the Advanced Media Library.
